Everyone who has become a slave to TikTok since the pandemic started has at least some idea about the different sides of TikTok. The most common examples may be “Gay TikTok” and the dreaded “Straight TikTok”. Besides these, there are many crazy areas on the app that you can be pulled into, based on the content that any given user interacts with the most. Currently, I am stuck on “Arts and Crafts TikTok”, and I’m loving it here.
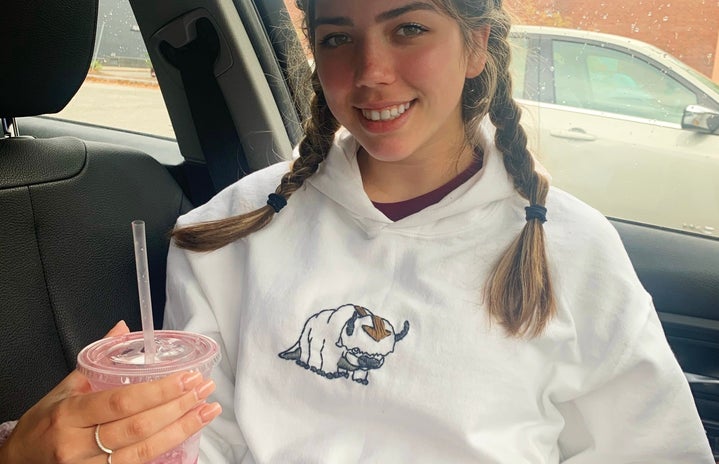
Over the last couple of weeks, embroidery videos have become more prevalent on my feed, and I took this as a sign from the holy spirits that I, too, had to embroider an article of clothing. One specific video by TikTok user @kimbroidery really inspired me, and in this article, I will be somewhat following her process and creating an Appa-embroidered hoodie (from “Avatar – The Last Airbender” for anyone who is still getting around to watching the show)! Feel free to follow along.
~ Side note: If you want to follow along, try the stitches on a separate fabric before you stitch your hoodie if you don’t have experience with embroidery ~
Supplies
For this project, I did have to go out and buy some supplies, but it was overall probably a $25 project.
Here’s what I used:
- A hoodie (I bought this off of Amazon for $16, you can use any article of clothing)
- Embroidery needle (I just used a random needle I found in my house that could just fit the embroidery floss through the hole)
- Embroidery floss (I used black, light and dark grey, and brown)
- Embroidery hoop (not necessary but made life easier and they’re only like $1 from crafts stores)
- Heat erasable pen (I bought this on Amazon, it’s amazing)

Step 1
The first step in this process is going to be poking holes through the picture you want to use as your guide. Make these holes close enough together so that your final piece will have round lines and not jagged points. I used my needle for this and did it over my hoodie to protect my fingers and the table.

Step 2
Next, place your picture over the hoodie. Use your heat-erasable pen to mark through the holes in the pictures onto the hoodie, creating a dotted outline of your picture. You can connect these dots with the pen as well to make a clearer guide to sew over.


Step 3
I really was winging it with the rest of this piece. The third step is to embroider in the outline of your picture. I used black to sew in all of the important lines on Appa’s body. I used a back-stitch for this whole part. Click here for a quick back-stitch tutorial.

Step 4
The final step is to fill in any color that you want on your piece. I filled in Appa’s arrow, horns, nose, belly, toes, and tail. I’m not sure what this stitch is called but I basically just did giant back-stitches over and over until the areas were full. This step isn’t necessary but it adds a really cute touch! For this part of the embroidery, I used an embroidery hoop just to hold all of the fabric in place but you don’t have to. It probably would’ve made my life easier if I used it for Step 3 as well.

Although this project took me approximately 6 hours to complete, it is worth it because it’s adorable and wasn’t very difficult to do. My mother has now claimed the hoodie as her own but I luckily managed to snag some pics in it before!
If you followed along and embroidered with me! Thanks for joining me on this little arts and crafts mission, and I hope to see you next time. I bet it came out super cute.
If you were just reading along for progress pics, I definitely recommend trying this if you have the time. It’s super relaxing if you’re a stressed bean like me!!


